Add Variables
Add User Variables |
AUTHOR™ allows you to create and manipulate User-defined variables. As the name suggests, Variables are named objects that may change or vary in value when the lesson is run. You will have already used variables if you have defined Conditions in the Response section of an Element. The most commonly used variable is the ANSWER variable which contains the value of the student’s answer. For example, if you created a Multiple Choice question with 4 buttons (e.g. A, B, C and D) you would have entered a Value for each of the buttons (you may decide to assign the buttons the Values of A,B,C and D respectively). This is how AUTHOR™ identifies which of the buttons the student selected. The Value of the student’s answer is stored in the ANSWER variable. If the student responds to the question by pressing the C button, the ANSWER variable will contain the Value of the pressed button, C. |
|
System Variables |
The variables that are built-in to AUTHOR™ are called System variables. Examples of System variables are FIRSTNAME, LASTNAME, TIME, DAY, MONTH, YEAR, CORRECT and INCORRECT. The Value and name of these variables is determined by AUTHOR™ (not by you). You may display the Value of these variables in Text or Feature text within your multimedia module by using square brackets around the name of the System variable. E.g. If you place the text below in a Text or Feature text action: Congratulations [FIRSTNAME] you have passed! If Teresa Roberts runs this lesson from the Training Management System she will see Congratulations Teresa you have passed! when she runs the lesson. See System Variables for additional information. |
|
Creating user-defined variables
|
User-defined variables allow you to make your own variables, perform operations on them and use them to determine whether certain Actions in an Element should occur. The simplest use of User-defined variables is to store student responses for later use in the lesson. To start creating and manipulating variables you need to add a Variable action to your Action list.
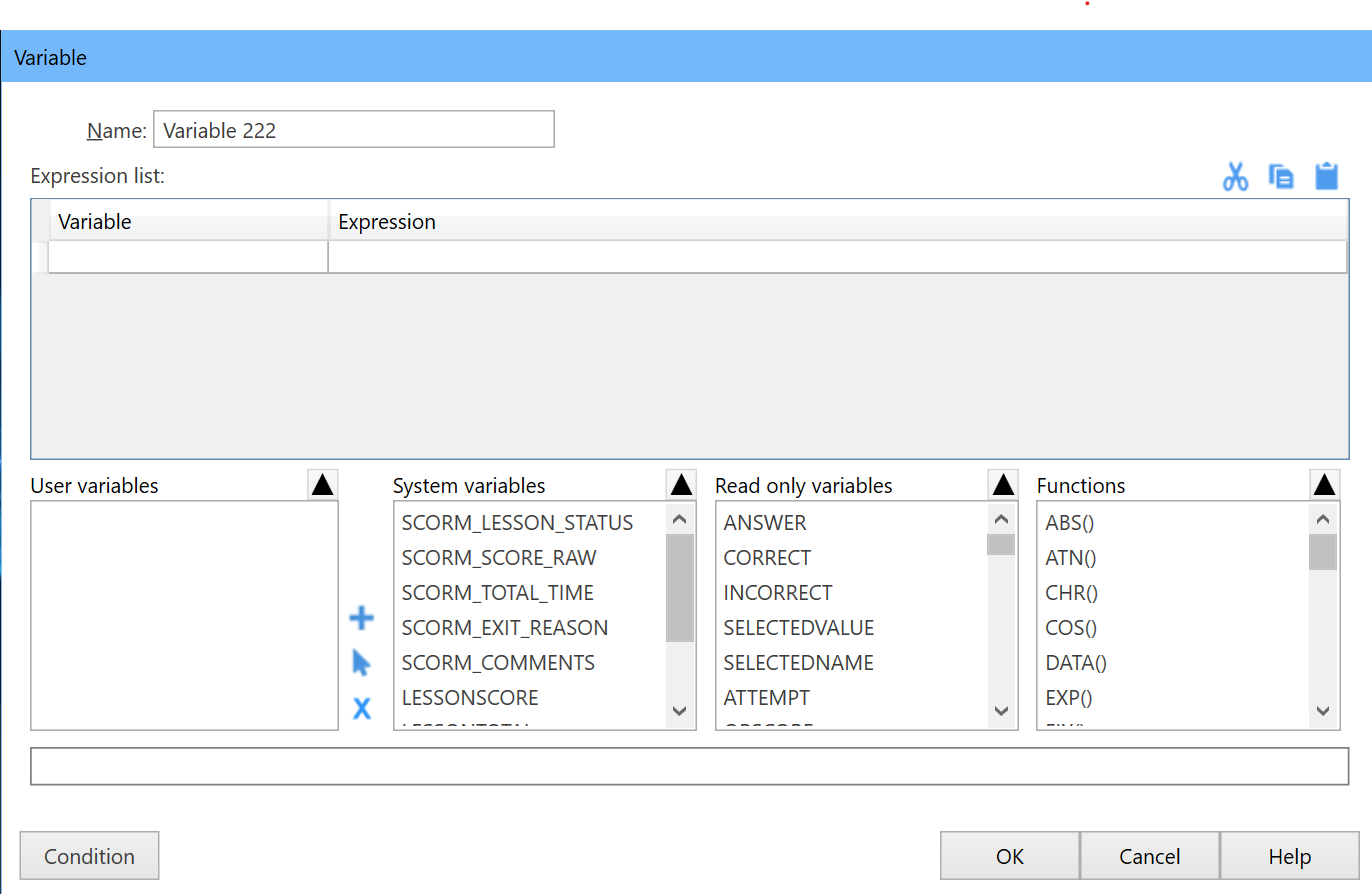
The User defined variables dialog will then appear. This is where you can create new user defined variables and assign values to them.
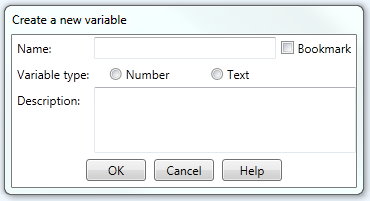
To create a new User defined variable click on the New button to the right of the User variables list. The New button is a plus symbol. This displays the Create a new variable dialog box.
Type a name for your variable into the Name field. The name of the variable should be meaningful. For example, if you are creating a variable that will be used to store the age of the trainee then using a name like VariableOne does not tell us much about the purpose of this variable. However, naming the variable TraineeAge means that we instantly know what that variable is used for. Bookmark allows the variable to persist through sessions using browser cookies. Bookmarked variables will be read when a lesson starts and saved when a lesson stops. You can also supply a Description for the variable providing even more detailed information about the purpose and use of this variable. Once you have created the variable, the description is displayed whenever you highlight the variable in the User variables list in the User defined variables dialog box. Finally, you need to specify the type of your new variable by selecting either Number or Text in the Type of variable frame. If the variable does not need to have numeric operations performed on it then define it as text. Once you have created a variable you can assign a value or expression to it. You can of course simply type in a literal value for the variable such as INTROVERTED or 345. However you may also assign the value of other variables such as ANSWER or DATE or any other User defined variable you have created. The available variables are displayed in the User variables and System Variables list. Simply highlight the variable and press the Insert button ⏶ at the top of the list. The variable will appear in the Variable list. The Expression List can contain the value of other variables by adding their name in square brackets [], arithmetic operators or functions and will concatenate strings by default. E.g. If TempF and TempC are numeric variables for Fahrenheit and Celsius temperatures and Display is a string variable for displaying the converted temperature with a degree symbol and a capital C. You could enter the following in the Add Variable Expression list: TempF = 104 TempC = ([TempF] - 32) * 1.8 Display = [TempC]°C In a following Text Action you could then add "The temperature [TempF]°F is [Display] which would display when testing the element The temperature 104°F is 40°C Note that you cannot use mathematical operations within the expression for a string variable. The Functions list will display either numeric or text functions that you may use to manipulate the values in the expression list. You will notice that you may perform a variety of common numeric functions such as SIN COS etc, while the text functions allow you to strip spaces or extract characters from the existing text. The use of these functions to build expressions requires some knowledge of programming. You may set a variable to any combination of literal values, strings and the value of other variables. CHR(integer) Returns a string character based on the number specified UCASE(string) Returns a string in upper case LCASE(string) Returns a string in lower case TRIM(string) Trims white space from the beginning and end of a string LEN(string) Returns the length of a string LEFT(string,int chars) Returns a string containing a specified number of characters from the left side of a string RIGHT(string,int chars) Returns the string containing a specified number of characters from the right side of a string INSTR(int start,string,sstring) Returns and integer specifying the start position of the first occurrence of sstring within string MID(string, start, howmany) Returns a string starting at the position specified with the characters specified RND(first, last) Returns a random number or a random number between two numbers INT(string) Returns an integer based on the string SECONDS_TO_TIME(integer seconds) Returns the hour minutes and seconds for the specified seconds ROUND(number, [decimal]) Returns a value rounded to the nearest integral value or to a specified number of fractional digits SUM(X1,X2,X3....) Returns the sum of all the numbers specified MAX(number,number) Returns the larger of 2 numbers MIN(number,number) Returns the smaller of 2 numbers ABS(number) Returns the absolute value of a number ATN(radians) Returns the arc tangent of a number as a value between mine as -PI/2 and PI/2 radians COS(radians) Returns the cosine of the specified angle EXP(number) Returns E the base of natural logarithms raised to the specified power LOG(number) Returns the natural base E logarithm of a specified number SGN(number) Returns An integer value indicating the sign of a number SIN(radians)Returns the sign of the specified angle SQR(number) Returns the square root of a specified number TAN(radians) returns the tangent of the specified angle Arrays AUTHOR only supports 1 dimensional string arrays with the items separated by new lines. To create an array, create a text variable and then enter the array elements each on a single line. An array item may also be a variable with the name enclosed in []. Once the array has been created, you may reference any element with the variable name followed by the line number required enclosed in curly brackets {} E.g Lets say you want to display a random word from a list. Create a text variable called Words an insert it in the Variable list. Manually add or cut and paste an existing list into the expression field Words = Accord Ball Clock Dog Create a numeric variable called RandomNumber. RandomNumber = RND(1,4) To display the word in a text action The word is [Words{[RandomNumber]}]
|
|
Dialog controls |
See The Action Toolbar for information about the dialog controls displayed at the bottom of the dialog box. |


